How to Automatically Update Shopify Inventory From Google Sheets
Update Shopify inventory from a Google Sheet automatically, no Zapier needed. Publish the sheet as a CSV link, match rows by SKU, and update stock on a schedule. Here's the exact setup.
Simple Apps LLC
Simple Inventory
11 min read
To update Shopify inventory from a Google Sheet, publish the sheet as a CSV link, paste that link into an inventory sync app as a scheduled feed, and let it match your rows to Shopify products by SKU. Shopify’s native CSV import is built for a different job: a manual upload, where you export a file, edit it, and upload it back by hand. Following a Google Sheet that changes through the week is a separate job, and it runs through an app that fetches the sheet on a schedule.
If you only touch stock now and then, the native import is fine and you can stop reading here: export from Products → Inventory, edit the On hand (new) column, and re-import. This post is for the other case. Your live numbers sit in a Google Sheet, yours or one a supplier keeps for you, the sheet changes through the week, and you want Shopify to stay current without copying figures across by hand every time.
Keep a Google Sheet as your source of truth and let Shopify follow it on a schedule. See how Simple Inventory does it.
What the native import does well, and where a Google Sheet differs
The native CSV import does one job, and does it well: you export your products, edit the file, upload it back. That’s exactly right for a deliberate bulk edit you’re making on purpose. It’s built around that manual upload, so there’s no field in Shopify admin where you paste a Google Sheets link and have it checked every morning. That’s a different job, not a shortcoming.
There’s a second difference that matters more. On import, Shopify identifies each row by the product handle, the variant’s options, and the location. That works beautifully because the file came out of your store and already carries those handles. A Google Sheet you build from a supplier’s numbers almost never has a Shopify handle in it. It has SKUs. So lining the sheet up with your catalog calls for a tool that matches on SKU, which is exactly what a feed sync is for.
Publish the sheet as a CSV feed (a share link won’t work)
This is where most people get stuck on the first try. Worth saying plainly.
The link you get from the green Share button points at the editing view of your sheet. That’s a web page, not a file. Point a sync tool at it and it pulls back a chunk of HTML, not your rows, and the import fails before it starts. Simple Inventory says exactly that when it happens: “We reached your file, but it doesn’t look like a CSV we can read. Export it as a comma-separated .csv and try again.”
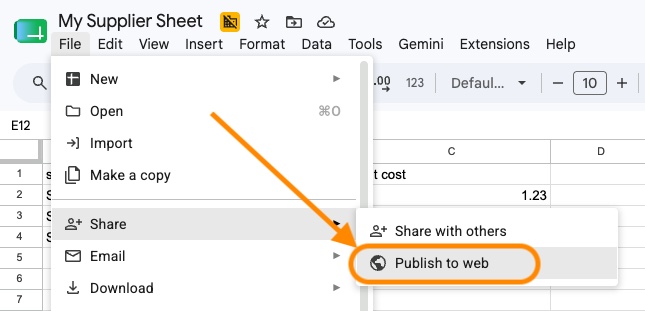
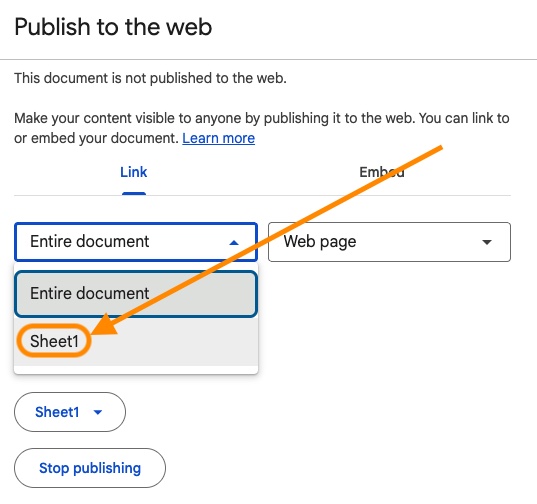
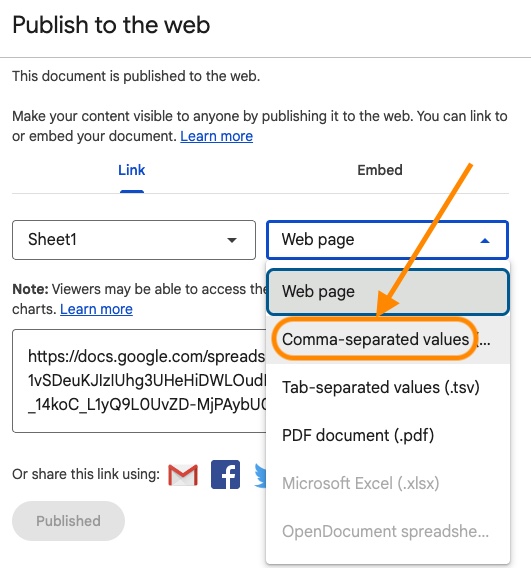
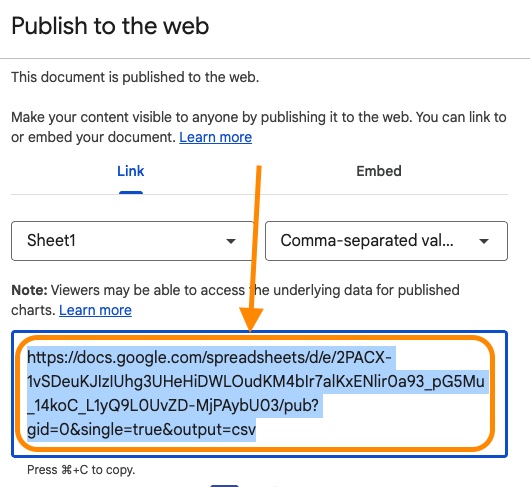
What you want is the sheet published as CSV. In Google Sheets, go to File → Share → Publish to web, pick the tab you want, choose Comma-separated values (.csv), and publish. Google hands you a link that ends in output=csv. That link returns the raw rows, updates when you edit the sheet, and needs no login, which is what a sync tool needs to fetch it on its own. One caveat: a published sheet can lag your latest edits by a few minutes. That’s Google caching the file on its end, not the sync being slow.
What your sheet needs
Before you wire anything up, get the sheet into a shape the import can read. The checklist is short:
- A header row in row 1. The first row has to be column names, not data.
- A column to match on: SKU or barcode. This is how each row finds its product in Shopify.
- At least one column to write back: quantity is the usual one. Price, compare-at price, and cost can ride along in the same sync if your sheet carries them.
One Google-Sheets-specific trap is worth heading off now. Long SKUs and barcodes. Sheets likes to turn 1234567890123 into 1.23457E+12, which is scientific notation, and that mangled value won’t match anything in your store. Simple Inventory blocks files like that by default so the bad data doesn’t get in, and there’s a toggle to allow it once you’ve fixed the formatting. The real fix is in the sheet: set the column to Plain text and the full value survives. Catch it there and you never see the error.
Set up the Google Sheets update in Simple Inventory
Pulling a scheduled feed from a URL is the job Simple Inventory’s automations are built for, and a published Google Sheet is just one kind of URL. Four steps.
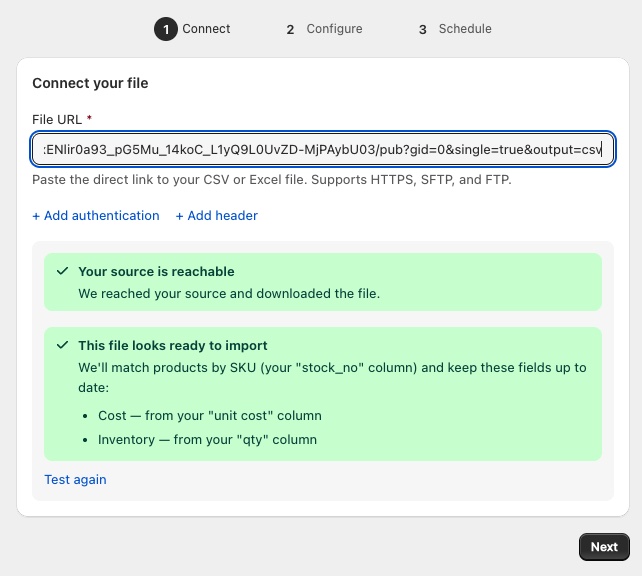
1. Paste your published link
Drop the output=csv link into the File URL field. The helper text spells out what it takes: “Paste the direct link to your CSV or Excel file. Supports HTTPS, SFTP, and FTP.” A published Google Sheet comes over HTTPS, so it goes straight in. If your numbers actually live on a supplier’s SFTP or FTP server instead of a sheet, the same field takes those too, and the supplier-feed setup is nearly identical from here on.
2. Pick the location and match key, then map columns
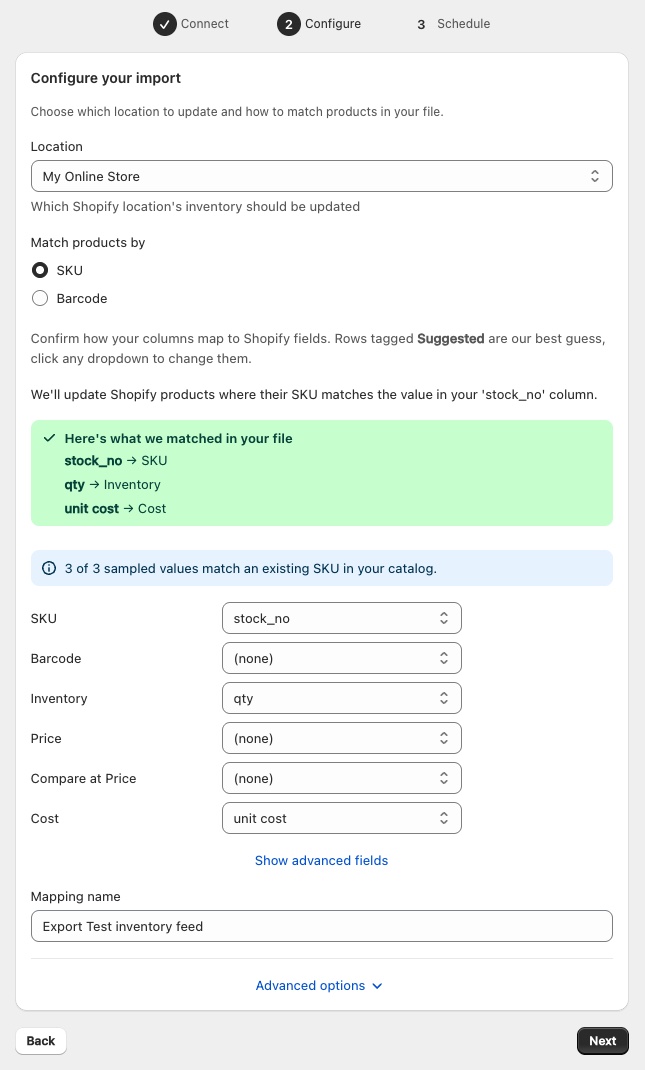
Choose which Shopify location this sync updates. One automation drives one location, so a warehouse and a retail floor each get their own. Then pick whether to match products by SKU or barcode.
Now map the columns. Your sheet and Shopify rarely name things the same way. Your sheet might call the count qty and the product code stock_no. Simple Inventory reads your header row and suggests the mapping, and you fix any it gets wrong from a dropdown. Before you activate, it fetches the sheet once and checks a sample of your rows against your actual catalog, then tells you what share of them it can match. A wrong column, or a barcode sitting in your SKU field, gets caught right there. Not after a bad sync has already run.
3. Set the schedule
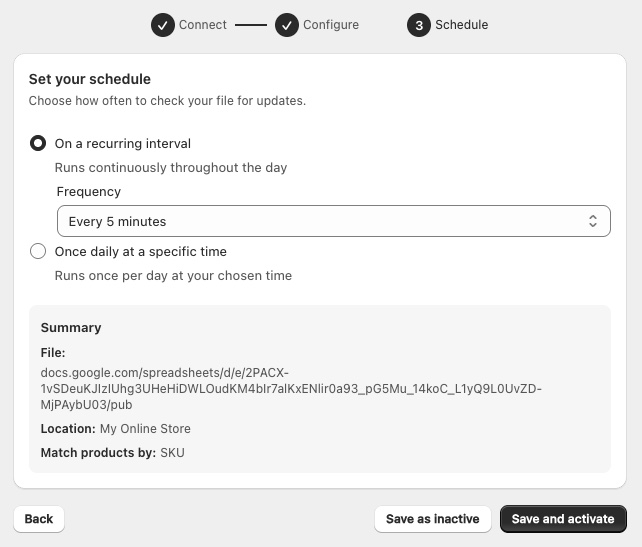
Two modes. Run it on a recurring interval, from every 5 minutes up to once every 24 hours (how often you can go depends on your plan), or once a day at a specific time and timezone you choose. Update the sheet each morning? Schedule it for a little after, and your stock is current before you open. It also only re-imports when the sheet has actually changed since the last run, so a sync pointed at a sheet you edit once a day doesn’t burn through runs doing nothing.
4. Let it run
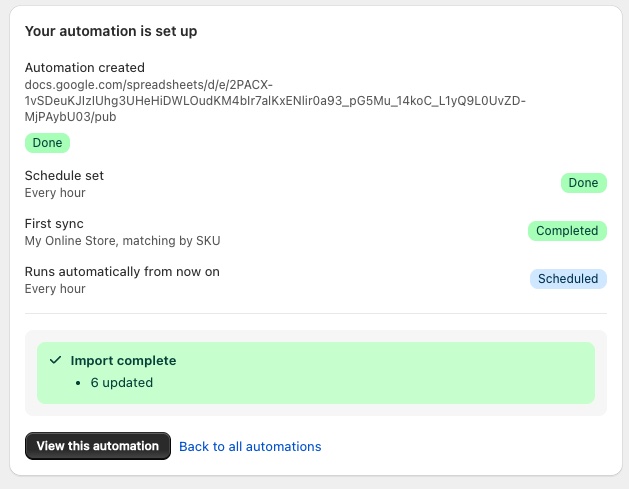
Save it and it runs on its own. Every run reports what it did: how many products it updated, how many were already up to date, and how many rows it couldn’t match, with a sample of up to five unmatched SKUs so a typo or a not-yet-created product is visible instead of swallowed. If a run fails over and over, say the sheet gets unpublished, the automation pauses itself and shows you the error rather than failing quietly in the background.
Stop re-keying your Google Sheet into Shopify by hand. Match on SKU, sync on your schedule. Simple Inventory is Built for Shopify, rated 4.9 stars, and has run on Shopify stores since 2015. Try it on your catalog.
Do you need an app at all? Apps Script, Zapier, and Make
You can move numbers from a sheet to Shopify without a dedicated app. A Google Apps Script can call Shopify’s API on a time trigger, and tools like Zapier or Make can watch a sheet and push updates. People do this, and for a small catalog it works.
The tradeoff is upkeep, and it shows up at scale. A script is yours to maintain: when Shopify rolls an API version or a column moves, you debug it. Per-row automations like Zapier fire one operation at a time, which gets slow and pricey across thousands of SKUs, and a failed row tends to vanish into a task history you have to go read.
A scheduled feed handles the parts that bite. It matches every row to a product by SKU or barcode, checks the match rate before it runs, and reports the rows it couldn’t place instead of dropping them quietly. If you’d rather not babysit a script, that’s the case for an app.
What about SKUs in the sheet that aren’t in my store yet?
Straight answer: a feed sync keeps existing products stocked. Simple Inventory updates variants that are already in your store and won’t create new ones from the sheet. A row whose SKU it can’t find gets skipped and counted, not silently dropped and not turned into a new product. So if your sheet is mostly brand-new SKUs, add those products to Shopify first, then let the sheet keep them stocked from then on. Restocking the same catalog week to week? This never comes up.
FAQ
Can Shopify update inventory from Google Sheets automatically?
The native CSV import is built for manual uploads of files you export from your own store, which is its own job. To have Shopify update from a Google Sheet on a schedule, you publish the sheet as a CSV link and point a sync app at it.
Why does my Google Sheets link fail or return a login page?
You’re almost certainly using the normal Share link, which opens the editing view as a web page. A sync tool needs the file itself. Use File → Share → Publish to web, choose CSV, and use the output=csv link it produces.
Do I have to make my whole sheet public?
Publish-to-web exposes a read-only CSV of the one tab you choose, at a link that isn’t listed anywhere. It doesn’t grant edit access and doesn’t touch the rest of your Drive. If your data is sensitive, keep only the SKU and quantity columns on the published tab.
My SKUs show up as 2.3E+12. What’s wrong?
Google Sheets reformatted long numbers as scientific notation. Set those columns to Plain text in the sheet so the full value is kept. Simple Inventory blocks files with scientific notation by default so the bad values don’t reach your store.
Can it update more than quantity?
Yes. Quantity is the common case, but price, compare-at price, and cost can sync from the same sheet if you map those columns.
How often should it sync?
Match it to how often the sheet actually changes. Edit it once each morning and a daily run at a set time is plenty. Faster intervals are there for sheets that change through the day.
Can I use Google Sheets for inventory management?
Yes, as your source of truth. A spreadsheet is a fine place to keep stock numbers, especially if your team already works in one. It just doesn’t talk to Shopify on its own, so pair it with a scheduled sync that reads the sheet and updates your store. You keep editing the sheet, and Shopify follows it.
What’s the difference between syncing inventory to Google Sheets and from it?
From a sheet means the sheet drives Shopify: you edit stock in the sheet and Shopify updates to match. That’s this guide. To a sheet is the opposite, pulling Shopify data into a spreadsheet for reporting, which is a different tool and a different job. If you want your sheet to control stock levels, you want the from direction.
Bottom line
The point is to take the copy-paste step off your plate. Keep your numbers in the Google Sheet you already work in, publish it as CSV once, and Simple Inventory pulls that link on the schedule you set, matches it to your catalog by SKU or barcode, and keeps Shopify current, with no manual re-uploads.